


ZWO Seestar S30 Plus Review: Dual 2K Imaging, Specs & Comparison


The ZWO Seestar S30 Plus is a 30mm smart telescope with two cameras, 2K output, and a $499 price tag. It was built to be the perfect middle ground between the original Seestar S30 and the S30 Pro. It has upgraded optics and more features than the S30, but a lower resolution and narrower view than the Pro.
In this review, I'll go through the hardware, the app, and my deep-sky images. I will also make sure to compare the S30, S30 Plus, and S30 Pro so that you know exactly how they differ and which one to pick!

Table of Contents:
Seestar S30 Plus: What's In The Box?
Just like other smart telescope models, the S30 Plus comes as a complete imaging system. Everything you need to start imaging is built into the unit, so you can immediately take it out of the box and use it. There is no need for external cameras, mount, battery, or cables!

In the ZWO Seestar S30 Plus box, you'll find:
ZWO Seestar S30 Plus
A small tripod
A magnetic solar filter
A carrying bag
A USB Type-C cable
Safety instructions and quick-start guide
ZWO-themed stickers
The Tripod
The included tripod is the same as the S30 and S30 Pro telescopes. It's very small and compact, and does the job just fine as long as you're in Alt-az mode.

The base has a 3/8-16 mounting thread, so if you want to, feel free to use a different tripod if you need more height or want to use Equatorial mode. Using a taller tripod is especially useful if you don't have a table to place the Seestar on, and trees or houses surround your backyard. Having that extra height will clear more of the sky.
The good thing with this tripod is that it's so small that it fits in the carrying bag just perfectly!
The Battery

The S30 Plus has a 6000 mAh battery, the same capacity as the S30 and S30 Pro. It is supposed to last up to six hours under ideal conditions.
You can charge the battery by plugging in the USB-C cable from the telescope to a power source. It has a specified input of 5 V and up to 3 A.
The S30 Plus is rated to operate from -10°C to 40°C, but charging is specified from 0°C to 40°C.
The Filters
The main camera has three built-in filters:
UV/IR-cut filter: The normal choice for broadband targets like galaxies and star clusters. Both cameras have UV/IR-cut filtering.
Duo-band filter: For the telephoto camera only, with 30 nm O III and 20 nm H-alpha passbands. This one is best for emission nebulae, as it will isolate HA and OIII signal.
Dark-frame filter: This will block all light and is used when shooting calibration frames on the telephoto camera.
On top of this, it has one external filter:
Magnetic solar filter: This is a separate filter that attaches easily on the lens before you do solar imaging. Of course, always have this on if you slew the telescope to the Sun.
The duo-band and dark-frame filters are only available for the main telephoto sensor.
Seestar S30 Plus Design and Dual Camera
The S30 Plus keeps the usual folding-arm design of the Seestar telescopes. The base rotates left and right to locate and track targets, while the lens opens for imaging.

Like the Pro version, the Plus has two sensors. The main camera is for Deep-Sky Objects (galaxies, nebulae, star clusters...), the second camera is for wider targets like the Milky Way of course, constellations, and shooting star trails. This wide-angle lens can also be used for daytime photography if you are into bird watching, etc.
Both cameras shoot in 2K (the output is 1440 x 2560), about 3.7 megapixels. The main camera uses an SC485SL sensor in a 1/1.8-inch format, while the wide-angle camera uses a 1/2-inch Sony IMX586.
The main lens has a four-element apochromatic design with ED glass. Compared with the S30's three-element design, this extra layer of correction is here to improve the shapes of your stars and reduce halos.
Milky Way and Wide-Angle Imaging
The wide-angle camera has a 6 mm focal length, a 3.4 mm aperture, and an f/1.75 focal ratio. It can autofocus from 0.1 m to infinity. The official field of view is of 43.5°, but the output is cropped to a portrait view to fit your phone's screen.
That still gives you plenty of room for constellations, nightscapes, Milky Way compositions, star trails, and time-lapses. It also makes the Plus much more versatile than the original S30's wide-angle camera, which does not have the dedicated Milky Way and star-trail mode.
Get the ZWO Seestar Premium Online Course!
If you want to learn everything about your Seestar telescope, and get the very best results out of it, be sure to take a look at my ZWO Seestar Smart Telescope Mastery course. It will teach you everything from A to Z, from unboxing your unit to processing your images!
The course has 100+ lessons, including videos and downloadables, and is updated regularly and includes new Seestar models.
ZWO Seestar S30 Plus: Specs and Price
The S30 Plus has a 30mm aperture, a 160mm focal length, and an f/5.3 focal ratio. Its field of view is 3° in portrait orientation. That is wider than the original S30's 2.46° field, even though the focal length has increased from 150mm.
Main optics: Four-element APO with ED glass
Main sensor: SC485SL, 1/1.8-inch format
Wide-angle sensor: Sony IMX586, 1/2-inch format
Field of view: 3° main, 43.5° cropped wide-angle
Storage: 64 GB eMMC
Mount: alt-azimuth with equatorial-mode support
Connections: 2.4/5 GHz Wi-Fi, Bluetooth, USB-C, and NFC pairing
Image format: JPEG and FITS; video: MP4 and AVI
The S30 Plus launches at a discounted price. Click HERE to check the current price as of today.
Size, Weight & Setup of the Seestar S30 Plus

Weight: 1.65 kg, about 3.64 lb
Closed dimensions: 210 x 140 x 80 mm, (8.27 x 5.51 x 3.15 inches)
Mounting thread: 3/8-16 inch
These are the exact same dimensions and weight as the S30 and S30 Pro!
Setting up the telescope is, as always, very easy. Simply attach the tripod to its base, turn it ON using the only button on the unit, and open the Seestar app. Connect through its WiFi and follow the prompts to get started. Assuming it is charged, you should be able to start imaging in less than 2 or 3 minutes!
Make sure you are level when you place the telescope down, and go through the Seestar catalog of targets to slew to one.
Controlling the Seestar S30 Plus with Your Phone
The Seestar app is what you'll use to control your telescope. It's often updated and is full of cool features! I go over this in depth in some of my previous Seestar reviews, as well as on the Seestar Mastery course, but if you're new to astrophotography, I'll quickly explain the basics here.
With the Seestar app, you will be able to connect to your telescope, pick a target of your choice, and tell the Seestar to slew to it. It will automatically choose the best filter, focus, and center itself. You'll then be able to start imaging and see the result appear on your screen live. This imaging tab will update every 10 seconds (or more if you pick longer exposure times) with live stacking, making your object look better and better.
The app has five tabs:

Home / Seestar: The main dashboard, imaging modes, album, and session tools.
SkyAtlas: The sky map for finding and choosing targets.
Community: Images and posts shared by other Seestar users.
Nearby: Location-based community images.
Me: Your profile, telescope settings, and updates.
When you're done, save your image as a JPG on your phone or use other formats like FITS if you want to process it outside the app. For beginners, I recommend using the app to enhance your image right before saving.
For another way to control your telescope, see my guide to controlling a Seestar from a computer.
Deep Sky Astrophotography Using the Seestar S30 Plus
Here are my S30 Plus images of the Andromeda Galaxy, the Pacman Nebula, and the Elephant's Trunk region. They show the same small telescope working on a broadband galaxy and emission nebulae with different filters and tracking settings.
The Andromeda Galaxy
This was taken in Alt-az mode. My Andromeda Galaxy stack is made up of 870 exposures of 10 seconds each, for 2 hours and 25 minutes of total integration time, without the light pollution filter activated. I saved both the unprocessed version (middle) and a version I quickly processed inside of the Seestar app (right). The left image is what I saw on screen as it started capturing it.
While Imaging Unprocessed Processed inside Seestar
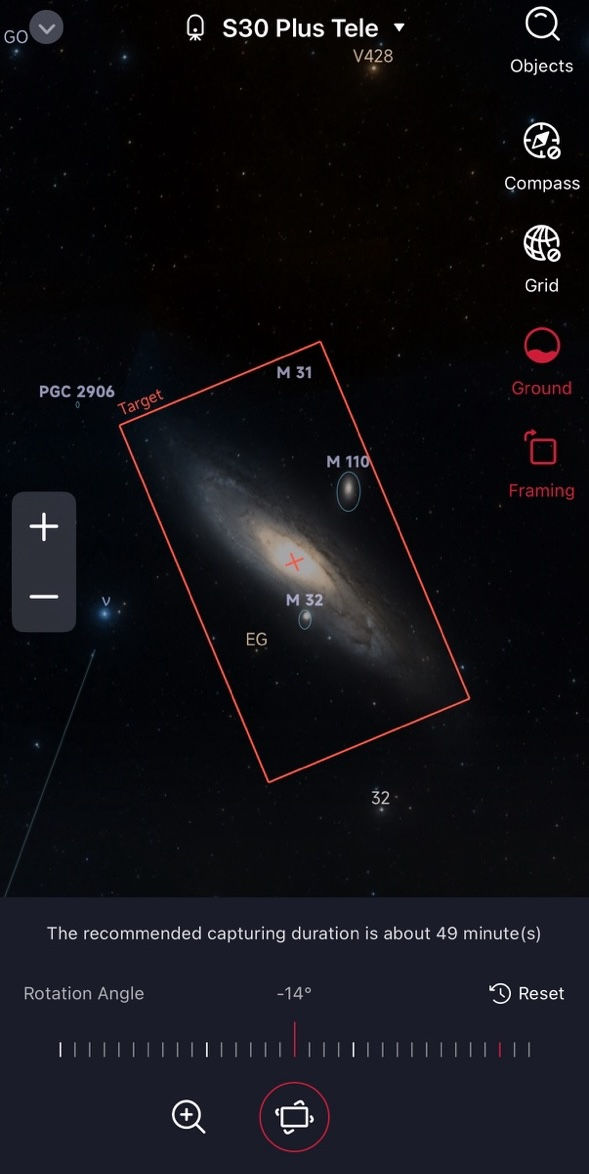
The bright core and dark dust lanes look nice, and the colors really pop up well when enhancing the picture inside of the app. M32 above the galaxy and M110 below are visible as well. The outer parts of the galaxy run close to the sides of the portrait frame, so for large objects like M31, be sure to use a custom framing in the SkyAtlas. I did not do it for this attempt, but should have. You can see below how to galaxy would have looked if I spent just 10 seconds reframing it!
The Pacman Nebula
Still in Alt-az mode, I then wanted to capture a nebula, that way we can try the duoband filter since M31 wasn't a good target for that.
I chose a target that was high in the sky, NGC 281 (The Pacman Nebula). I gathered 701 ten-second exposures which is a total of 1 hour, 56 minutes, and 50 seconds. Below, you can see the object as it came out of the imaging sequence, and on the right, enhanced inside of the app.
Unprocessed Processed in Seestar
The result is nice but not very impressive, yet I wouldn't blame the S30 Plus for this. This was taken after M31 right when I went to bed. When I woke up in the morning, I went to get the Seestar unit from outside and realized that it was full of water! I show it better in my video review, but the night was full of dew, with fog creeping up while the Seestar was in the middle of imaging!

This tells me that you can definitely get a much better picture of the Pacman Nebula than shown here.
The Elephant's Trunk Region
Because I wasn't happy with how my Pacman Nebula attempt came out, I decided to wait for another night and image the Elephant's Trunk Nebula. This time, I used EQ-mode.
Once again, I decided to show you the unprocessed version (left) and the one I quickly enhanced within the Seestar app (right):
Unprocessed Processed in Seestar
The IC 1396 image is 318 exposures of 30 seconds, so 2 hours and 39 minutes of integration. It shows the dark Elephant's Trunk and the surrounding red emission nebulosity. This was taken with the duoband filter, very useful for this target.
I am overall impressed with this picture! The trunk section looks great, and the overall nebula fits just right in the S30 Plus' field of view. It shows real potential if you spend even more time on it, perhaps several nights worth of integrations would make it a very impressive shot.
The Pleiades with the S30 Plus
Finally, I tried shooting M45 (The Pleiades cluster) on the last clear night. This time, unlike M31, I made sure to rotate the field of view so that the entire cluster was visible in portrait mode.

The result is great with only about one hour of integration time!
My Premium Astrophotography Course
Want to learn more than just the Seestar? Knowing all aspects of astrophotography will help you understand the night sky better, feel more confident with all the devices you use, and get much better pictures overall!

The Galactic Course covers so many different astrophotography topics, including image processing for all types of targets. It includes lifetime access to your chosen courses, which lets you learn at your own pace without fear of missing out. You also get all updates for free forever! Pictured above are just a few examples of courses available, so be sure to check them all out.
Planetary, Lunar, and Solar Imaging with Seestar
The S30 Plus can photograph the Moon and the Sun with its main camera. You can also attempt planetary imaging, but with such a short focal length and 30mm aperture, it definitely isn't ideal for the task.
For the Sun, make sure to attach the dedicated magnetic solar filter before pointing the telescope toward it. This is white-light imaging, useful for sunspots.
I'll be adding my attempt at Lunar and Planetary as soon as clear skies allow me.
Seestar S30 vs. S30 Plus vs. S30 Pro: Which One Is Best for You?
All three have a 30mm main aperture and the same size, weight, and battery capacity. The differences are mostly in the optics, sensors, framing, wide-angle capabilities, and storage.
Quick Spec Comparison
Spec | S30 | S30 Plus | S30 Pro |
Main sensor | IMX662, 1/2.8-inch | SC485SL, 1/1.8-inch | IMX585, 1/1.2-inch |
Main output | 1080 x 1920 | 1440 x 2560 | 2160 x 3840 |
Main optics | 30 mm, 150 mm, f/5 | 30 mm, 160 mm, f/5.3 | 30 mm, 160 mm, f/5.3 |
Optical design | 3-element APO + ED | 4-element APO + ED | 4-element APO + ED |
Main field of view | 2.46° | 3° | 4.6° |
Wide-angle output | 1920 x 1080 landscape | 1440 x 2560 cropped portrait | 2160 x 3840 portrait |
Wide field of view | 23.2° | 43.5° cropped | 63° |
Wide lens | 14 mm, f/3.5 | 6 mm, f/1.75 | 6 mm, f/1.75 |
Milky Way / star trails | No dedicated mode | Yes | Yes |
NFC pairing | No | Yes | Yes |
Storage | 64 GB | 64 GB | 128 GB |
New Features on the S30 Plus
Higher output resolution than the original S30, with about 3.7 MP instead of 2.1 MP per frame.
A larger main sensor and a wider main view.
Four-element APO optics instead of the original triplet.
A wider, faster wide-angle lens with dedicated night-sky shooting modes.
NFC pairing (which I always use nowadays, so it's a great addition)
So, Which One Should You Get?
If you already own an S30: The Plus adds useful wide-field functions and higher-resolution captures. But if you already own an S30 and feel like you are ready for an upgrade, I wouldn't get the S30 Plus! I would strongly consider getting the Seestar S50 Pro, which will feel like a true jump up.
If you don't own any smart telescope: The Seestar S30 Plus is a great choice for beginning, and that's what it was made for! The $499 price is fair for specs like the dual 2K imaging, very compact body and nice deep-sky imaging capabilities. Although the Pro version is still better, the Plus is more budget-friendly and still very rewarding to use.
For reference, and to give you an overall idea of the differences in cost, the current prices of the three available S30's at the time of writing this review are:
Seestar S30: $399
Seestar S30 Plus: $499 (without counting the launch discount)
Seestar S30 Pro: $699
Telescope prices often change from year to year, so be sure to check the current prices as of today!
I also made a review video of the S30 Plus which you can watch above.
Compare the S30 Plus with All Other Smart Telescopes
You can use the interactive table below to compare all smart telescopes. Use the filters to rank them by what matters most to you, and see if the S30 Plus would be a good fit for your goal and budget.
Final Verdict
The S30 Plus does its job at filling the gap between the original S30 and the S30 Pro. The main gains over the S30 are dual 2K output, the four-element optical design, wider framing, and dedicated wide-angle night-sky modes. It keeps the same portable size and battery capacity. It also has NFC connection which is always nice to have, and something I personally use all the time.
My deep-sky images show a galaxy and two emission-nebula regions captured with the Plus. There are a few cons about the S30 Plus, but overall, and for the price which is very fair, this is a great beginner telescope that, in my opinion, makes much more sense to get over the original S30 despite its slightly higher cost.
Pros
Two cameras with 1440 x 2560 output.
Four-element APO main optics with ED glass.
Milky Way and star-trail feature
NFC Pairing
Cons
Lower resolution and narrower fields than the S30 Pro.
64 GB storage, half the Pro's
Limited aperture and focal length for small targets and planetary detail.
If you decide to use a Seestar, my Seestar Smart Telescope Mastery course can help you work through everything, including setup, capture, and processing step by step.
Make sure to follow Galactic Hunter on Facebook, Instagram, and YouTube to stay up to date with everything!
Clear Skies,
Antoine Grelin
Galactic Hunter


Comments