DwarfLab Dwarf II - The Smallest and Most Affordable Smart Telescope - Full review
- Antoine & Dalia Grelin
- Dec 23, 2023
- 14 min read
The DWARFLAB Dwarf II is among the most popular smart telescopes currently available, so it was our duty to finally review it!
The Dwarf II is a very small, lightweight, easy-to-use telescope that is unique by having two lenses instead of one. Can this be useful for astrophotography?
The Dwarf II is also the most affordable smart telescope out there, but how does it compete in this new age of smart telescopes? In this review, we will try capturing the beauty of space using the Dwarf II smart telescope, and see what results we can get from it.

Table of Contents:
What's in the box?
Specs & Price
Size, Weight, and Mounting
How to Set Up the DWARF II
Dwarflab App
Deep Sky Objects with the DWARF II
Planetary, Lunar, and Solar Astrophotography with the DWARF II
Final Verdict | Pros & Cons
DWARF II: What's In The Box?
The Dwarf II, along with its tripod and included accessories are shipped in a single small box. We received the Deluxe Edition for this review, which has a few more accessories than the cheaper classic edition. Below you can see what exactly comes with each edition.

In the box we received:
The DWARF II Telescope
One Carrying Bag
One Battery (inside the telescope)
One 64GB microSD Card
One Mini Tripod
The Manual
The Deluxe edition also includes, in that same box:
One Extra battery
One UHC Filter
Two ND Solar Filters
One Filter Adapter
The Tripod
The Tripod that comes with the DWARF II telescope looks great and almost alien-like, which is preferred over generic mass-produced tripods.
The tripod has a tiny ball head built at the top, but that's pretty much it in terms of functionality. The legs open but do not extend, making the tripod very short overall. This is in our opinion not an issue since the whole point of the DWARF II telescope is to be as tiny as possible, but you might feel like it sits too low to the ground if the sky from your backyard isn't very open.
To counter this, you can either get a taller tripod elsewhere, or place the telescope and tripod on a chair or table, which is what we do as our backyard is mostly surrounded by trees and tall houses.
The Carrying Pouch

The DWARF II smart telescope comes with its own carrying bag, which is awesome considering the already-low price of the unit! Yes, the pouch comes with both the classic and the deluxe edition, and feels very nice in hands.
The telescope fits perfectly in there, along with every single accessory (tripod, filters, filter holder, extra battery...)
As we said in several other reviews, we truly appreciate when companies include a carrying bag or case with their telescopes, cameras, and other products, so good job on Dwarflab for including this bag at no extra cost!
The Batteries

The DWARF II smart telescopes comes with either one lithium battery (for the classic edition) or two (for the Deluxe edition).
Each battery is 5600mAh and will last about three to four hours. If you're planning on imaging all night long, we strongly suggest getting a second battery if you do not already have one.
Extra batteries cost about $60 and weigh 150g.
The Filters
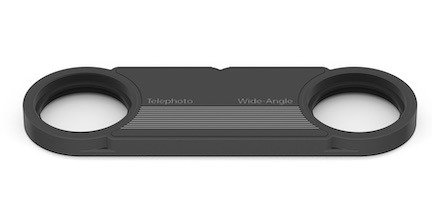
Filters are available for the DWARF II and can be attached using a magnetic filter holder. There are two main filters you can purchase:
UHC Filter
ND Solar filters

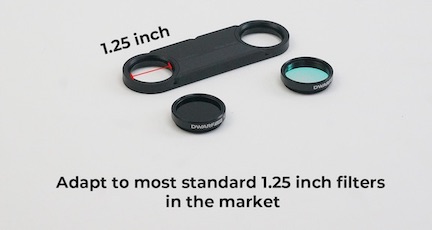
The filters are very easy to attach and remove, as all you need to do is snap them to the lenses using the filter plate.
In case you are unsure as to when to use which filter, let us clear things out for you:
The UHC filter is a light pollution filter that can be used to reduce the effect of light pollution gradients and overall unwanted brightness. This filter can be good if shooting from the city but, in our experience, only works well with a few types of targets, and emission nebulae aren't one of them. You only need to cover the telephoto lens for this. The UHC filter has a 97.48% transmission rate at the 656nm hydrogen-alpha.

The ND solar filters need to be used as a set of two, as both the wide-angle and the telephoto lenses should be protected before pointing at the sun. These solar filters work well for the sun and are of course only designed to image the sun.

The filters are very easy to attach or remove thanks to the magnetic plate as you can see above. This filter plate has a standard 1.25'' screw thread, making it compatible with any 1.25'' filter. This means that you can, if you like, purchase a dual-band or other 1.25" from any company and use it on the DWARF II.
DWARF II: Specs and Price
What are the exact specs of the DWARF II smart telescope, and how much does it cost?
The DWARF II telescope has a periscope design and comes with an IMX 415 Starvis sensor. It has two lenses, one wide-angle lens and one telephoto lens. It has an aperture of 24mm (0.9 in).
The wide-angle lens has a focal length of 48mm, a focal ratio of f/2.4, and a resolution of 2 Megapixels. This lens has a field of view of 50° and is meant for either widefield daytime photography, or to help you aim at your target manually at night. Aiming at bright objects like the moon or planets with this lens is very easy and quick.
The telephoto lens has a focal length of 100mm, a focal ratio of f/4.2, and a resolution of 8 Megapixels. This lens has a field of view of 3° and is used for imaging deep sky objects, or for close-up daytime shots if you are for example into bird photography.

The DWARF II telescope has built-in Bluetooth and WiFi, a battery life of approximately 3-4 hours, and can save images as .PNG or .FITS if you'd like to process the data yourself on your computer. The mount design is alt-az, and slews surprisingly very fast!
Connecting to the DWARF II is very simple. You simply need to open the app, search for the Bluetooth signal, and connect to your unit. It will then ask you if you want to use the WiFi and you're then ready to take control! The app takes a bit of time to understand due to the many different modes and shortcuts on screen, but it is overall user-friendly and works well in most cases.
At the time of writing this review, the classic edition of the DWARF II costs $459 + tax in the United States. The Deluxe edition costs $595 + tax and both editions are available for purchase at High Point Scientific.
In Europe, the classic edition costs 557 € and the Deluxe edition costs 602 €.

Size, Weight & Setup of the DWARF II
Weight: 2.6 lb
Height: 8 in
Width: 2.4 in
Depth: 5.1 in

The DWARF II weighs 2.6 pounds (1.2 kilograms) making it the lightest and most portable smart telescope out there so far! It has a size of 8 x 2.4 x 5.1 inches (20 x6 x 13 centimeters).
It will fit in any bag, including of course the small pouch it comes with. The DWARF II can easily be taken on any hike, plane, or other types of travel around the world as it will fit anywhere!
How to set up the DWARF II?
It only takes seconds to set up the DWARF II telescope and turn it on. You simply need to:
Get the unit and the tripod out of the bag, and screw in the tripod to the base of the telescope.
Open the legs and set the telescope on the ground.
Make sure the ground where you placed the telescope is level. You can use your phone or a bubble level to check this.
Press the power button once to turn the telescope on.
That was easy, right? If you plan on using filters, you can first rotate the lenses up to reveal the opening, and snap the filter adapter on there before turning on the telescope.

The DwarfLab App: Control the DWARF II with your Phone
The DWARF II, like other smart telescopes, is meant to be controlled entirely through your phone. The app required to use the DWARF II is simply called "DwarfLab" like the name of the company.
DwarfLab is free, often updated (the latest update from December 25, 2023 changes the entire UI), and is made up of three main tabs. Upon launching the app, you will right away be prompted with a way to connect to your nearby DWARF II. The connection is very quick and easy.

The left tab is the Album tab, where you will be able to see all the pictures you have taken so far with the DWARF II telescope.
The gallery is sorted by date, and all of the stacked and stretched images can be seen at a glance. There is also a logo at the bottom left of each image telling you in which capture mode each was taken. The name of the target is also visible at the bottom of each picture square.
When tapping on an image, it will open in full screen with an option to download the file to your smartphone. You can also delete each file directly from the app.
On the top right is a button to select multiple images quickly, so that you can in turn save them to your phone or delete them all at the same time.

The center tab is the Home Tab, and, as the name applies, serves as the home page for the app.
This tab shows three main sections:
Battery level and Space available: The current battery level on the DWARF II telescope, as well as how much space is still available on the inserted SD card.
Telescope: An image of the DWARF II telescope which you can tap to enter the capture window, which we'll talk about below!
Light Setting: This might be important for you if you plan on using the DWARF II near another telescope, for example, your second rig or at a star party. In just one tap, you can turn on and off the Ring Indicator light which is on the side of the DWARF II. This ring light is bright green and, if close to other telescopes, may be bothersome as it can create reflections. You can also turn on and off the Battery Indicator, which are 4 green lights under the Ring Indicator light. Once both are turned off, the telescope will not emit any light!

The third tab is the Settings tab.
Here, you will have access to diverse camera connection settings, as well as a way to change the app's language.
You'll also find the terms of service page, the privacy policy, and the app's current version installed.
Lastly you can clear the cache, which can be useful to fix any glitch you may encounter in the app.
The place you'll spend the most time in however will not be one of the three tabs mentioned above. Instead, it will be in the Imaging window which you can access by tapping on the Dwarf's image in the Home tab.
Here, you will be able to calibrate the telescope, slew to the target of your choice, change settings, focus, and of course photograph an object. You will also have direct access to your album of images.
The screenshot below shows an example of the page, wich the settings submenu open. For a full understanding on how the app works, be sure to watch our review video where we do a full walkthrough of the app.

Deep Sky Astrophotography with the DWARF II Smart Telescope
We are reviewing the DWARF II during the Winter, so we have plenty of bright popular deep sky objects available in the sky that would be a great fit for the smart telescope.
For our first image attempt, we told the DWARF II to aim at the easiest nebula for beginner astrophotographers, the Orion Nebula. We shot this object for only one hour, as our main goal was to compare the result with other popular smart telescopes in our Ultimate Smart Telescope Comparison video.
With just one hour of integration time and from a Bortle 9 backyard, we can say that the result is not bad at all! The core is not over-exposed, the gasses making M42 are visible, as well as the ones making M43. The Running Man Nebula is slightly visible at all and the background looks clean.
This image came out of the DWARF II as is, and was not processed at all besides cropping the edges for this post. We'd now like to spend several hours on this same target from a dark site and see what we could get!
We then decided to image two more deep sky objects, and went with the nearby Horsehead Nebula and the Rosette Nebula. These are two large nebulae that will fit perfectly in the DWARF II's wide field of view. We did not use filters for this as the only available deep space filter with the DWARF II is not ideal for emission nebulae.
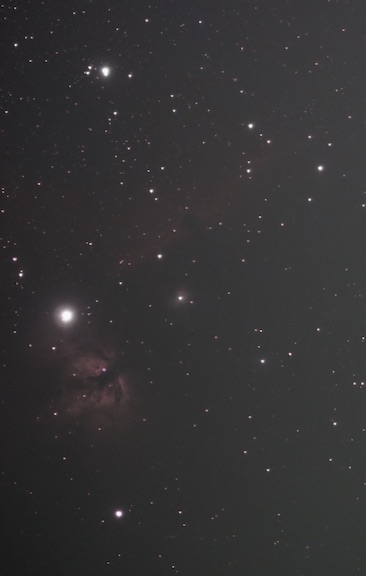
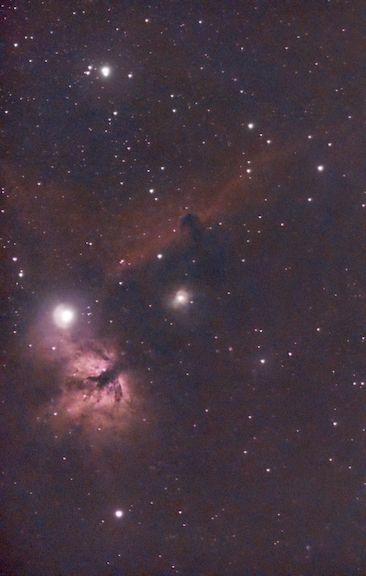
This picture of the Horsehead Nebula has a total integration time of 2 hours. On the left, you can see the result coming straight out of the DWARF II app. On the right is the same file but processed on the computer using PixInsight. As you can see, it is very difficult to spot anything on the original image besides the bright Flame nebula. All the signal is there, and comes to life if you take time to process the data manually on your computer, as seen on the right.
We are not surprised that the horsehead gasses are not visible on the left, as the Horsehead Nebula section is tough to image from a Bortle 9 backyard without a filter, and would be a much better dark site target.
The Horsehead Nebula with the DWARF II
Lastly, our last deep sky target was not far from the Horsehead and rose with the Monoceros constellation. The Rosette Nebula is also a large target that is a good fit for the DWARF II.
Below you can see two pictures similar to the ones of the Horsehead. On the left is 2 hours of integration time stacked and downloaded straight from the application. You can see the center cluster of stars, and hints of hydrogen alpha all throughout the field of view. On the right side is the exact same data processed with PixInsight, wow, what a difference!
This shows how important it is to export your master file on your computer and learn processing techniques that will help you get the best out of your data.
The Rosette Nebula with the DWARF II
As you saw in these images, large targets fit well in the DWARF II's field of view.
One thing to note though, is that the longer you spend on a target, the more you will need to crop in order to remove the visible edges as the telescope does not have a field derotator and sits on an alt-az type of mount.
To illustrate what I am saying, you can see below the original full-size image of the Rosette Nebula before applying a crop. Keep this in mind if you decide to image a large deep sky object, as a short integration time might be best if you do not want to sacrifice your edges!

There is actually one thing you can do to combat the issue of field rotation, and that is using the DWARF II in EQ mode. That's right, the DWARF II, unlike other smart telescopes that have come out so far, supports EQ tracking! For this, you'll need to attach the device to a regular tripod and aim in at the North Star Polaris. To achieve a great polar alignment, you can tape a straw (maybe pasta could also work) to the side of the DWARF II telescope, making sure it is aligned parallel to the telescope's azimuth axis. Then, simply align Polaris in the opening for calibration.
Take a look at the image below to see what we mean!

Our Premium Astrophotography Course
Want to learn all aspects of astrophotography in the most efficient way possible?
The Galactic Course includes a LIFETIME membership that gives you unlimited access to all current and upcoming astrophotography content. Step into an ever-growing realm of knowledge and learn at your own pace. Make life-long friends and connections with other members, and get tips from instructors that truly care about your journey and progress under the night sky.
Planetary, Lunar, and Solar Imaging with the DWARF II
The DWARF II, like other smart telescopes, wasn't designed for planetary imaging, and it also isn't supposed to be fantastic for the moon either but we'll go ahead and see what we can get out of these targets! We'll also attach the solar filters and snap a picture of the sun.
Jupiter using the DWARF II

Jupiter, as predicted, does not look good with the DWARF II. Like we said, this telescope is not made for imaging planets and the focal length is just not long enough. The planet's color is also off.
At least, a couple of the planet's moons are visible, which is still cool to show your friends or kids.
The Moon using the DWARF II

We then pointed the DWARF II telescope at the moon, which was currently at a nice phase with lots of craters visible.
The moon is large and bright, so it is an easy target for most telescopes. In this case, the moon is nice and the colors look natural. The only problem is the resolution, which is enough if looking at the image as is, but quickly shows its limitations when zooming in on the image.
Overall, the moon looks nice if you do not zoom in, but the craters and the edges of the moon will show issues if you get too close.
The Sun Using the DWARF II

Important: Both solar filters need to be attached to the DWARF II. Due to the double-lens design, you need to protect not only the telephoto imaging lens but also the wide-angle lens.
The sun was easy to capture with the DWARF II telescope, and it's also very simple to find in the sky manually if you use the widefield lens to aim at it.
Several sun spots are visible on the sun, and the overall color is a pale orange.
Important Note:
A new stacking feature became available around the time we were testing the DWARF II, which is supposed to greatly improve the results from planets, the moon, and the sun. Sadly, all our images were already shot and we left on vacation shortly after so we were not able to try the stacking feature for this review.
We will do our best to update this section with new images from what the stacking feature can produce, but in the meantime, take a look at the beautiful example below! This was sent to us by DwarfLab to showcase what could now be achieved after the update. As you can see, it now produces images with better details, colors, and overall higher resolution!
Final Verdict
Is the DWARF II good for astrophotography? What do we like? What do we dislike? Is it worth the cost?

Here are what we believe are the main positive and negative points about the DWARF II:
POSITIVES:
Size, portability, quick setup
The DWARF II is the smallest and lightest smart telescope we've ever tried. Its size and weight are truly unbelievable, and set the standard as to what all smart telescopes should try to achieve. The DWARF II is very portable as it will fit ain any bag, including the small pouch it comes with. This makes it very simple to take on airplanes and travel anywhere with it.
The Dual-Lens
The Dual-Lens design is very nice and feels unique. Although you'll only be using the telephoto lens when doing astrophotography with the DWARF II, the wide-angle lens can still be useful! For example, you can use the wide-angle lens to manually slew to your target, which is easy if it is something bright like the Orion Nebula, the Moon, the Sun, or planets. This lens can also be used for some daytime fun if you are into landscape photography. It can also be used to easily aim at smaller things before switching to the telephoto lens, like birds or faraway buildings.
The Magnetic Filter Adapter
This is one of the coolest things about the DWARF II! Once the filter(s) of your choice are mounted on the filter holder plate, you simply need to snap the plate to the telescope using the magnetic base and... that's it, no need for any screwing! That makes it very easy to attach or remove filters in just a second.
The EQ Mode
One feature that we haven't found in other smart telescopes is the ability to track in Equatorial mode. This allows you to take longer exposures and not have issues with field rotation. Using EQ mode, you will not need to crop your images and won't be limited by how much time you can spend on a target before field rotation becomes problematic. Just be sure to have a tripod, and... a straw for polar alignment!
NEGATIVES:
It won't beat a full Astrophotography setup in terms of image quality
Since we mentioned this as a Con for all the other smart telescopes we reviewed, it wouldn't be fair to not include it here too. So yes, obviously, do not expect high-resolution results as you would with a regular astrophotography setup. As of today, full astrophotography rigs still always prevail over smart telescopes when it comes to image quality!
Planets and Some Deep Sky Targets simply don't look good
Obviously, planets are not the DWARF II's favorite type of targets, but that is fully understandable as the field of view is wide and meant for deep-sky objects. On a related note, you won't be able to, let's say, get great pictures of all the Messier objects out there, as the DWARF II mostly produces good results on the largest and brightest objects in the night sky.
Interested in adding the DWARF II to your equipment?
If you would like to purchase this product, you can do so at High Point Scientific! The DWARF II is also sold on Amazon.
If you already own this and have taken some great images with it, attach them to the comments section of this post so we can all see your work!
If smart telescopes are not the right product for you, but you are motivated to start Astrophotography, check out our complete guide on beginner astrophotography equipment!
Clear Skies,
Antoine & Dalia Grelin
Galactic Hunter







Comentários